The assembly of a Revell model kit begins with identifying the components in the cast frame using the assembly instructions.? It is precisely at this moment that it is often decided how much joy your new hobby will bring you. Many beginners face the same challenge and keep asking us this one crucial question in the community: "How do you properly prepare Revell components before gluing?"
A hasty start often leads to broken parts, unclean edges or glued areas that simply don't want to hold. When preparing Revell, it is important to follow the correct steps. If you are wondering how to properly prepare Revell components before gluing, you have come to the right place. The quality of a Revell model is defined by the professional removal of the components and not just by the painting.
In this guide we will show you step by step how you, as a beginner, can properly prepare Revell components before gluing. Practical experience shows that a prepared Revell is crucial. We'll explain to you which tool you really need, how to avoid typical beginner mistakes and why correct deburring makes the difference between a toy and a real collector's item.
What is the correct component preparation in model making?
Component preparation is the process of removing, cleaning and adjusting plastic parts before the actual gluing process. The importance of preparing Revell is often underestimated. If you properly prepare Revell components before gluing, you will create the essential foundation for a seamless and realistic final model. Level 1 and 2 entry-level models usually consist of 20 to 50 individual parts, all of which require a certain amount of basic treatment. A practical tip for the construction process is to familiarize yourself with the instructions before starting the project and sort all the parts carefully. The importance of preparing Revell is often underestimated. This makes construction much easier and minimizes the risk of errors. If you want to properly prepare the Revell components before gluing, you should never break any parts out of the frame in advance. Proceed strictly according to the construction stages in the instructions so as not to lose track.What tools do you need for the first Revell model?
A solid basic equipment for model building consists of five core components: side cutters, files, plastic glue, basic colors and brushes. When preparing Revell, it is important to follow the correct steps. You don't have to spend a fortune to properly prepare Revell components before gluing. Budget beginners can get off to a good start with around 50 to 80 euros and get everything they need Model making tools. For the first steps, you will definitely need a special model making side cutter that has a flat cutting edge. When preparing a Revell, it is important to follow the correct steps. A simple pair of scissors or a household utility knife often damage the soft plastic beyond repair. Fine sandpaper or model building files are also part of the basic equipment if you want to properly prepare Revell components before gluing. A cutting mat protects your table and provides a perfect work surface for all steps.How do you properly prepare Revell components before gluing? The 3 steps
Systematic preparation enables precisely fitting connections and prevents unsightly gaps in your finished model. When we are asked: “How do you properly prepare Revell components before gluing?”, we always recommend a clear three-step plan. This process enables the Revell plastic adhesive to weld the components together. Especially with more complex kits, it is important that you take enough time for this phase. The importance of a Prepare Revell is often underestimated. Preparation often accounts for up to 40% of the total construction time. Proceed systematically and only work on the parts that you need for the current construction step according to the Revell you need instructions.Step 1: Check and clean the cast frame
Washing the cast frames in warm, soapy water removes production-related release agents from the plastic surface. When preparing a Revell, it is important to follow the correct steps. This often overlooked step is extremely important if you want to properly prepare Revell components before gluing. During production, the molds are sprayed with a light film so that the plastic comes off. If this film remains on the model, neither the glue nor the paint will adhere properly later. Place the entire moldings in lukewarm water with a drop of dishwashing liquid for about 10 minutes. a prepare Revell plays a central role in this context. Then rinse them with clean water and let them air dry completely. Only after this basic cleaning should you begin to properly prepare and process the Revell components before gluing.Step 2: Remove the moldings correctly
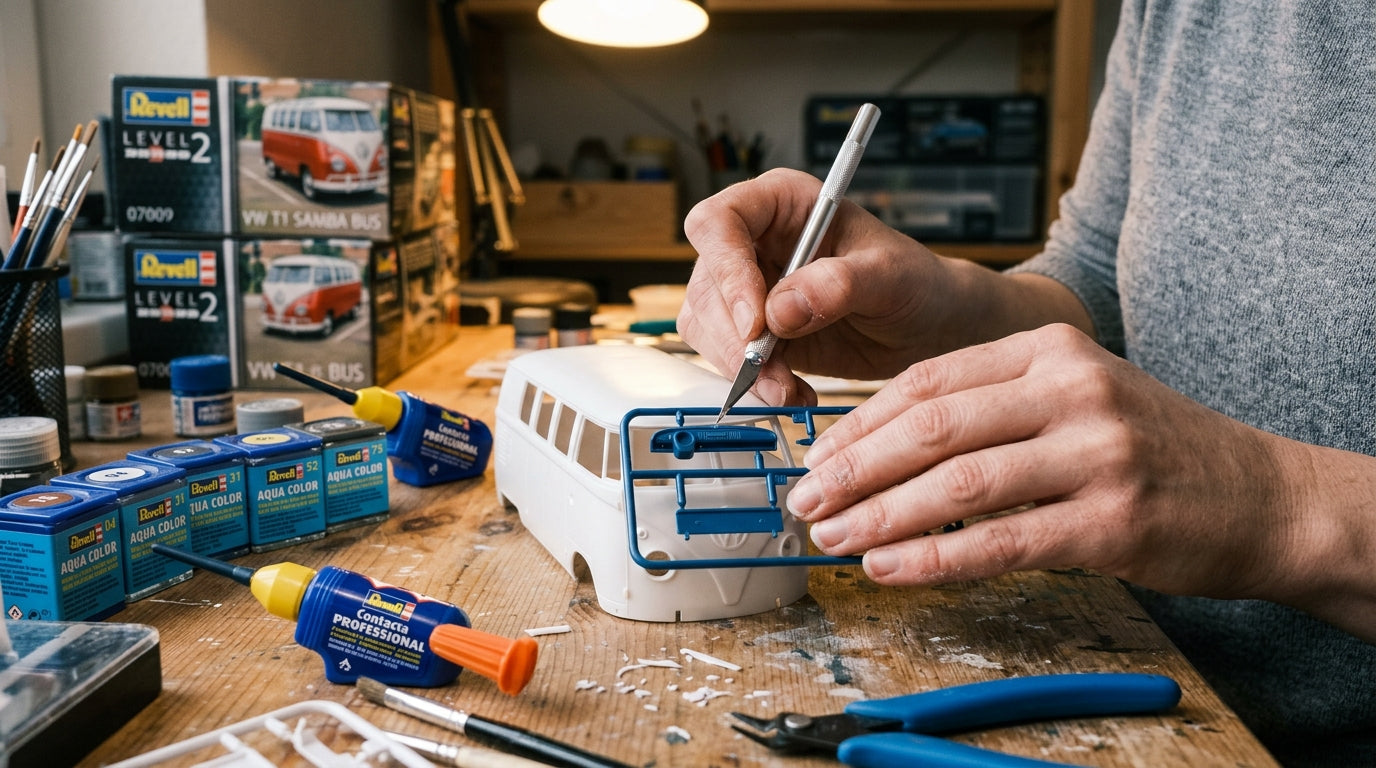
Demolding refers to carefully removing the individual parts from the injection molding frame using model making side cutters. To properly prepare Revell components before gluing, always place the flat side of the side cutter in the direction of the component. Make sure to leave around 1 to 2 millimeters of the sprue on the component. Never cut directly flush with the component! Experts recommend that you pay special attention to Revell. Otherwise, the pressure of the blade can cause small cracks in the soft plastic or a piece can break out of the component. If you break a delicate piece, it's not the end of the world. In such cases, our Revell spare parts service can help you easily. And if you misplace the instructions, you can always find a replacement in the download center.Step 3: Remove cast burrs and sand edges
Deburring is used to completely smooth any excess plastic residue at the interfaces using a file or fine sandpaper. Experts recommend paying special attention to Revell. This step is the heart of the matter if you want to properly prepare Revell components before gluing. Take the part that still has 1 millimeter of sprue left on it and carefully file it down until the surface is completely flat. Be careful not to change the natural curves or edges of the component. When preparing Revell, it is important to follow the correct steps. If you prepare Revell components properly before gluing, you will ensure that two halves (like an airplane fuselage) fit together later without a visible seam. A quick “dry test” – holding the parts together without glue – will show you immediately whether you need to sand anything else.Which glue is best suited for Revell models?
In contrast to traditional superglue, professional plastic glue welds the plastic parts together by slightly loosening the surface. Experts recommend paying special attention to Revell. All Revell adhesives are characterized by their quick drying time and long-lasting strength. If you were able to properly prepare your Revell components before gluing, the Contacta Professional adhesive ensures an inseparable bond. The Contacta Professional is the standard in the hobby community. a prepare Revell plays a central role in this context. It comes with a fine metal cannula that enables precise application. Always apply the glue very sparingly to one of the two adhesive surfaces. A common beginner mistake is to use too much glue, which then oozes out the sides and destroys the fine details of the plastic.Do you have to paint Revell models before or after assembly?
In contrast to the complete painting at the end, pre-painting on the sprue offers the advantage that tiny details are much easier to reach. a prepare Revell plays a central role in this context. How you properly prepare Revell components before gluing depends largely on the size of the parts. For small instrument panels, seats or engine parts, it is almost impossible to paint them cleanly if they are already installed deep into the model. We recommend for these delicate works Aqua Color colors. When preparing Revell, it is important to follow the correct steps. They are odorless, non-toxic and can be easily diluted with water. An important note: glue does not stick to painted surfaces! If you paint parts in advance, you must leave the adhesive areas (the so-called contact points) free of paint or carefully scrape off the paint there before gluing.Which Revell model is best for beginners?
The Revell Level system is a technically sound categorization that divides the level of difficulty of our kits into five levels from simple plug-in kits to professional projects. When preparing Revell, it is important to follow the correct steps. For beginners, Revell models with skill level 1 or 2 are recommended. If you want to properly prepare Revell components before gluing for the first time, these levels offer the perfect introduction without the potential for frustration. Level 1 includes simple plug-in kits (Easy-Click), which do not require any glue and are already printed in color. In practice it turns out that the prepared Revell is crucial. Level 2 requires basic gluing and light painting, but usually only has 20 to 50 pieces. Experienced model makers should only start at level 3 or 4, as highly detailed painting and extremely precise preparation are required here. If you order from the Revell online shop, you benefit from free shipping for orders over 50 euros.Conclusion: Successful start to your new hobby
Thorough preparation of the components reduces construction errors many times over and guarantees a clean, realistic end result. The question “How do you properly prepare Revell components before gluing?” can be answered with patience, the right tools and a systematic way of working. If you take the time to properly demold and deburr each part, you will be rewarded with a model you can be proud of. Model building is a fascinating hobby that brings relaxation and promotes concentration. Don't be discouraged at the beginning if everything doesn't look perfect right away - practice makes perfect. With every model you build, you become more confident in using side cutters, files and glue. Would you like to start straight away with your first project? Sign up for our newsletter now and get 10 euros off your first order. Discover our huge selection of entry-level models and find the perfect set for your start into the fascinating world of model building!Frequently Asked Questions (FAQ)
Which Revell colors are better for beginners, Aqua Color or Email Color?
Revell Aqua Color colors are much more suitable for beginners. They are water-based, completely odorless, non-toxic and can be diluted extremely easily with water. They also dry faster than solvent-based enamel paints and the brushes can simply be washed under the tap.
How do you apply Revell glue correctly and cleanly?
It is best to use the Revell Contacta Professional with the fine metal cannula. Practical experience shows that a prepared Revell is crucial. Apply only tiny drops to one of the two adhesive surfaces. Then press the pieces together lightly. If the cannula becomes clogged, you can carefully burn it free with a flame (lighter) as the glue inside evaporates.
What is the difference between Revell Easy-Click and normal kits?
Easy-Click kits (Level 1) are designed so that the components simply fit together, without any glue. They are also already sprayed in the correct basic colors, so painting is not absolutely necessary. Normal kits (from level 2) must be glued and usually painted yourself.
Approximately how long does it take to assemble a simple Revell model?
For a level 2 beginner model, you should plan around 2 to 4 hours of pure construction time. However, there are also the drying times for paints and glue. It is advisable to spread the construction over several leisurely evenings instead of trying to complete everything in one go.
How do you avoid brush strokes when painting Revell models?
Before applying, dilute your Aqua Color colors slightly with water until they have the consistency of milk. the prepare Revell plays a central role in this context. It is better to apply two to three very thin coats instead of one thick coat. Allow each layer to dry thoroughly. Also use soft, high-quality modeling brushes to achieve a streak-free result.